Winterland


Five years are long enough. I want an Amiga back on my desk. Even if it’s only for a few minutes at a time, I should have one close by for the occasional messing around. Finishing iGame is also an excuse, but I shouldn’t make promises I can’t keep…
My small computer desk can’t accomodate the monster the A3000 is, so the plan is to restore the A1200 instead. Honestly, I always liked it’s form factor better than the A3000’s. Who needs expansions? :-) Stock is great!
I was worried of how I would find it. A storage room with above average humidity levels is not the ideal place to store electronics. But alas, thanks to Commodore’s quality and engineering skills, it fired up on the first try. Motherboard working: Check. Blizzard MKIV 030: Check. Hard disk: Missing. Oh, well, not really a problem. I should anyway re-setup it. After all, half of the fun is in bringing it up from scratch.
Here’s what it looked like when I took it off storage:
{% img http://winterland.no-ip.org/images/a1200_from_storage.jpg %}
The case yellowing is not really visible in this pic, but trust me it’s there. The keyboard took most of the beating.
What it’ll be: near stock A1200 with Workbench 3.1 and ethernet. It should at the very least be able to compile and test iGame on it. Cool boys these days use CF cards on their Amigas and since I’m setting it up from zero, I’ll take advantage of the zero seek times and silent operation. Minimal software enchancments. (Yes, I really want to keep WB 3.1 as stock as possible. I’m weird.). That means no preconfigured Workbench sets. If I need something, I want to set it up and configure it myself. Knowing your install means less headbangs when something goes wrong.
Steps:
This part will be about step 1. At the end of it I should have a CF card ready to boot on the A1200. I’ve picked a 4GB sandisk card. 4 GB means I don’t have to worry about patching scsi.device, and provides plenty of space for what I’m interested in (Software devel… coughGames reallycough). A fellow Amiga user from amigahellas.gr sent me a CF to IDE adaptor for free! Thanks AmiJim!
Bootstraping a clean Amiga hard disk poses a chicken and egg problem. There’s no easy way to transfer files to a HD-less Amiga unless you own another that can write Amiga floppy disks, or setup a serial null cable to a pc… nightmare. My last from scratch Amiga setup was on the A3000 which had a cd-rom and a bootable 3.9 floppy disk. That was pretty straight forward, but now I’m gonna use UAE on a PC. Most of the guides online are using WinUAE on Windows. I’m using linux, so since I’m going through all the trouble I thought I would blog my experience with FS-UAE.
The plan is to set up FS-UAE with device access to the CF card (connected with a USB CF reader), another virtual hard disk mirrored to a specific path on the linux filesystem (this will help to transfer files to the CF), and boot it with the Workbench 3.1 install disk. Now it’s a good time to make a list of required software:
Ok, let’s do it.
First, find and install FS-UAE on your machine. This is off topic here, I’m assuming most people can get around their distro’s package manager. Fire up FS-UAE launcher and create a new configuration. We’ll need one as close as possible to your target Amiga. In my case, it’s gonna be a 68020 Amiga 1200 with kickstart 3.1.
Create a directory somewhere on your linux machine, and use this as a hard drive in FS-UAE’s Hard drive tab. The contents of this directory will appear on your workbench screen. No other setup required. Magic!. Mine is called “base_A1200” and I’ll use that name to refer to this drive from now on.
Insert disk “Workbench 3.1 Install” and “Workbench 3.1 Boot” in the Floppy Drives tab in this order. We need to boot from the Install disk. Add the rest of the pack (you should have 6 disks) in the Media Swap List. Test this setup. It should boot up to Workbench and be presented with a screen like the following:
{% img center http://winterland.no-ip.org/images/base_a1200_boot_fs_uae.png %}
Exit FS-UAE (F12 -> X). Save this configuration.
Let’s copy some stuff in “base_A1200”, needed for the CF install:
Let’s see now if the CF card works under this thing. Connect the card with a CF reader to the PC. Check it’s dev name (e.g. using dmesg). I got /dev/sdb and /dev/sdb1 (the first and only partition on the card). Make sure the user running FS-UAE has read/write access to it, the easiest way to do it is:
sudo chown user /dev/sdb
Not really sure if it makes any difference, but I went ahead and deleted the existing partition with fdisk.
Add the disk to the launcher Hard Drive tab. Add a “file” HD and pick /dev/sdb.
Open a shell, go to A1200_base:, run lha.run, and then use it to extract pfs3aio.lha.
Open HDToolBox, and edit the tools information. Edit the “SCSI_DEVICE_NAME” section to read
SCSI_DEVICE_NAME=uaehf.device
Save and run HDToolBox. It should list the CF at the start.
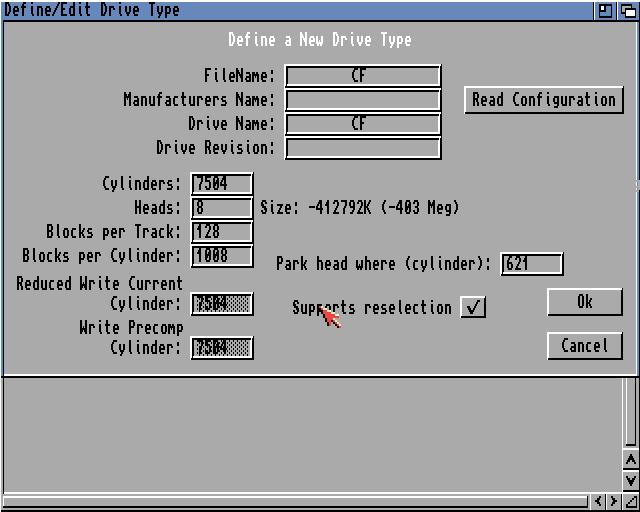
As it often happens in Amiga land, things don’t go exaclty how you’d expect them. HDInstTools wouldn’t “see” the card. HDToolBox would, but fails when reading the drive information (Error in SCSI Inquiry command). But don’t give up! All I had to do is input some values found online and create a custom entry called CF. I’m not usre they are correct; I just left them there and checked that eventually in the partition drive screen it gave me 4G of space to partition. Don’t mind the value calculated in the Edit Drive Type screen.
{% img http://winterland.no-ip.org/images/fs_uae_edit_drive_type.png %}
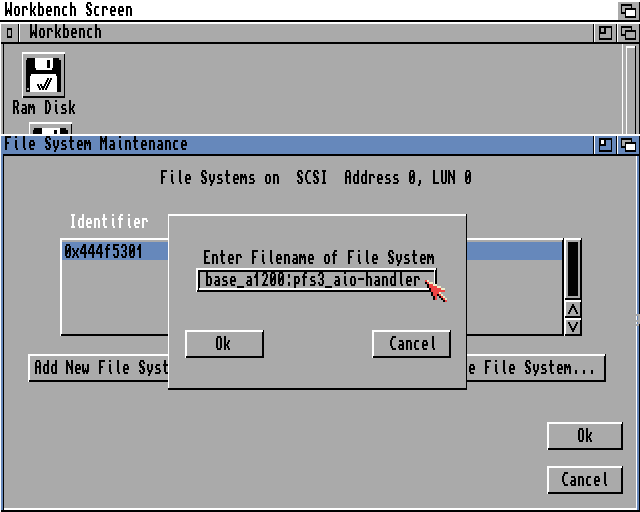
When that’s ready, click Ok and partition the drive as you like. I used 3 partitions, the last one being the largest one for the games. I suggest using a small part for the boot drive. 200-300 MB should be more than enough. Use the advanced options to change the file system type. Click on add new filesystem, and enter the path and filename of pfs3aio (extracted of course). In my case it was:
base_a1200:pfs3_aio-handler
{% img http://winterland.no-ip.org/images/fs_uae_pick_filesystem.png %}
You don’t need to copy pfs3_aio-handler to your boot drive afterwards. It gets written in the RDB of the disk. You only need to load it when editing/creating a new partition from hdtoolbox.
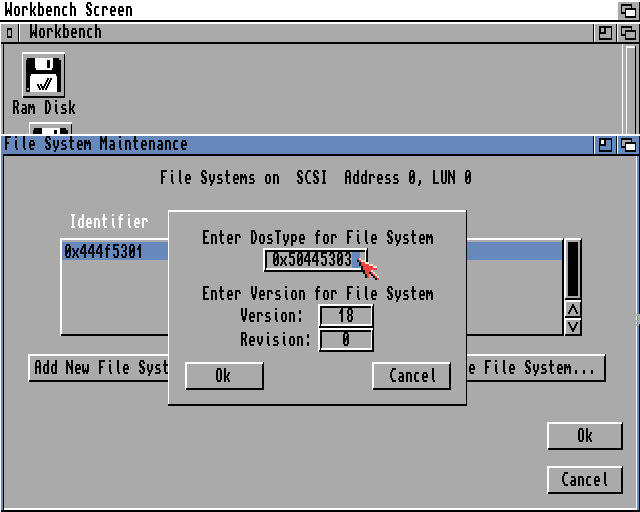
For dos type enter:
0x50445303
{% img http://winterland.no-ip.org/images/fs_uae_change_dostype.png %}
For each partition, choose “PDS/03” from the menu and enter the following for max transfer value:
0x001fe00
That should do it. Reboot and check. The new partitions should appear on WB with an NDOS label. Quick format them and you’re set. As a good job indicator, a PFS3 popup will let you know that the partitions are indeed using the new filesystem. Run the install script from the Install WB disk to complete the installation. Change disks when FS-USE is running by going to the menu (F12) and drives tab. (Remember to have all the 6 WB disks in the Media Swap tab).
Edit: When I finally got the card in the Amiga, PFS3 would complain about: “Allocated memory doesn’t match memorymask”. The solution was to enter the following as the TranferMask value:
0xfffffffc
Finally. At this poing I got an image of the card from linux using dd, to save me from future hassle.
Make sure that you copy anything needed before transfering the card to the Amiga. Stuff like MUI, AmiTCP, drivers for net cards, Aweb are needed to communicate with the outside world once the card is in the Amiga.
All I have to do now is wait for Amigakit to deliver some misc parts I ordered. The next blog post will focus on fixing up the hardware part.